
 5Likes

 LinkBack URL
 About LinkBacks
What you need to download
1. MPC-HC x86 installer (http://mpc-hc.org/downloads/ )
2. MadVR.zip ( http://forum.doom9.org/showthread.php?t=146228 )
3. XY-Subfilter Beta (http://forum.doom9.org/showthread.php?t=168282 )
4. Optional - dtsdecoderdll.zip - http://uploaded.net/file/rm536uau/dtsdecoderdll.zip
5. Optional - Reclock ( from the stickied thread here http://forum.slysoft.com/forumdisplay.php?f=85 )
Media Player and Video Renderer Installation
- First install media player classic home cinema. Check the box to reset settings during the installation if you've mucked around with the mpc hc settings before and want to start fresh.
- Install madVR by extracting it and running the install.bat for it.
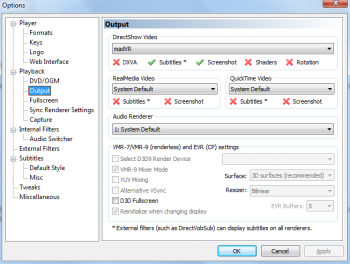
- Open mpc hc, press o for options, and go to output. For directshow video, choose madVR.
Installing XySubFilter
- To install XySubFilter, download the installer and run it.
- To configure mpc hc to use XySubFilter, open mpc hc, press o for options, go to playback, and uncheck autoload subtitles.
Disabling the Audio Switcher
- While we are in mpc hc options, go into the Audio Switcher subsection, and uncheck the box at the top.
Video Decoding
- Go to options, internal filters, and click Video Decoder at the bottom.
- The different GPU decoding modes are listed under hardware decoding in the upper right. Select nvidia cuvid for an nvidia gpu, intel quicksync for an intel gpu, and dxva2 copyback for an amd gpu. The one you plan on using should say "available" to the right of it after it has been selected.
- If you feel that your cpu is up to the task, you can select none.
Windows Audio Setup
- Go to control panel, hardware and sound, and then sound. Right click on your sound device, and then go to advanced. Here you can select the output format.
- 24 bit/48khz is a good value if you have 24 bit DACs.
- Go back to the sound window. Right click on your sound device and this time select configure speakers. Set it up to match your speaker setup.
- If you are using spdif output, you probably don't have this option, and don't have to do this step.
- If you have 2.1 computer speakers, select 2.0 and make them full range.
Lav Audio Config
Bitstreaming
- Go to options, internal filters, and click Audio Decoder at the bottom to open the Lav Audio settings tab.
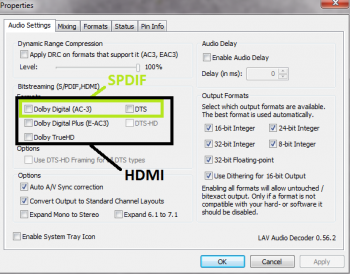
- Under Bitstreaming, select the formats you want to bitstream.
- For analog, don't check any, for SPDIF, check Dolby Digital and DTS, for HDMI, check all the options for bitstreaming. This is assuming you have a receiver with the proper decoders.
Optional - Advanced DTS and DTS-HD Decoding
- This is only for those who dont bitstream DTS or DTS-HD.
- Copy dtsdecoderdll.dll into C:\Program Files (x86)\MPC-HC\LAVFilters
- This will allow high quality DTS and DTS-HD decoding through MPC-HC.
MadVR Config
- To edit the madVR settings, first play any video in MPC-HC. Then right click in the video, go to filters, then click on madVR, and click edit settings.
- This is also a great chance to make sure all the lav filters are also showing up properly in the filters list.
Scaling
- Under the scaling algorithms section, you can customize the scaling used.
- A lot of people with high end graphics cards are using the Jinc or lanczos scaler at 3 taps with the antiringing filter for chroma and image upscaling (though still using catmull rom for image downscaling), which can be very gpu taxing (jinc moreso than lanczos).
- Alternatively, there is the option of dxva scalers for image upscaling and downscaling, and bilinear for chroma, which doesn't tax the gpu much and is a great choice for a low power gpu.
Display Modes
- madVR can switch different refresh rates to match the video's framerate.
- First see if your display supports other refresh rates. Right click on your desktop wallpaper and go to screen resolution. Choose the display you watch videos on and go to advanced. Then go to the monitor tab and look at the listed refresh rates.
- To have madVR automatically switch to the proper refresh rate, go to the devices section in madVR settings and choose the display that you watch videos on. Expand it, and then choose display modes.
- If your display showed a 23hz mode, you can enter 1080p23 for example. The desired refresh rates are usually 23.976, 24, 50, 59.94, 60, or multiples of these. The names of the non-integer refresh rates are shortened, so 23.976=23.
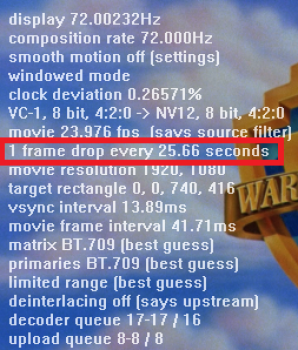
- You can check to see if the display's refresh rate changed by pressing ctrl+j while a video is playing; the refresh rate is listed at the very top.
Smooth Motion
- If you can't fully use the display modes feature of madVR, you may be interested in the smooth motion feature to remove judder.
- This is available through the rendering section of the madVR settings, under smooth motion.
Deinterlacing
- Go to deinterlacing, under the processing section
- There are 2 types of deinterlacing available through madvr. Video deinterlacing for video sources and film deinterlacing for film sources. Film deinterlacing is also known as inverse telecine.
- Default is video deinterlacing, but you may want to change it to film if you watch a lot of DVDs or HDTV
- Automatic source detection doesnt work at this time, so disable it and manually force film mode or video mode.
Subtitles
Intelligent Subtitle Selection
- Go to options, internal filters, and click Splitter at the bottom.
- Select Advanced for subtitle selection mode.
- If you are an english speaker, you will probably want to enter "eng:eng|f;eng:off;*:eng" (without the quotes) here.
- This will enable only forced english subtitles when english audio is present, and english subtitles when a non-english audio is present.
- This should generally lead to the correct subtitle choice, but if for some reason it doesn't, you can use the S key to cycle through the different subs present in the file or manually select subtitles through lav splitter (right click in the video, go to filters, lav splitter).
Optional - Reclock
Reclock can make videos smoother. Without reclock, you will have slight frame drops/repeats once in a while due to the frame rate not quite matching the refresh rate or intrinsic problems with the audio clock.
This can be fixed with reclock, but it has a few caveats:
1. You shouldnt bitstream with it. That means youll need the dtsdecoderdll.dll for dts-hd. Reclock needs uncompressed audio to work because it modifies it for smoother video.
2. You have to have set up display mode switching in madvr so that your videos frame rate is always near your refresh rate. Reclock will only modify the audio rate by a small amount, so it cant work if there is a large disparity between the frame rate and the refresh rate.
If you can meet this criteria, and youre intrigued by the idea of smoother video, follow these steps:
- You can install reclock using the installer. Note that you dont need PowerDVD support, dsound support, Arcsoft TMT support, etc, just the program files.
- Then, go into lav audio and disable bitstreaming for all formats.
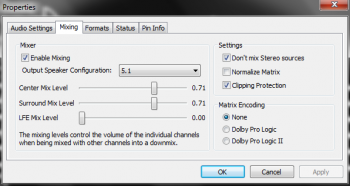
- While in lav audios settings, note the mixing tab. With reclock, we will use wasapi exclusive mode, which disables Windows mixer (the one you saw in control panel>audio>configure speakers). This may cause issues if you are using integrated audio, so you will have to use lav audio to mix to your speaker configuration. Also, be sure to check "Don't mix stereo sources" if you want mono and stereo streams to remain untouched. If you have a dedicated sound card or an hdmi multichannel receiver, you can likely skip all this specify speaker config through the sound card or receiver instead.
- Configure MPC-HC to use reclock as the audio renderer by going to options, output and selecting reclock as the audio renderer.
- Open the configure reclock shortcut from the start menu. Choose Wasapi for PCM, choose best sinc interpolation for quality, choose 24 bit padded to 32 for format, and uncheck output mono to front channels if you have a center speaker (5.1 configs, etc)
- And thats all. Youll should see the green reclock icon in the taskbar while videos are playing, indicating that reclock is doing its thing.
Updating Software
- You can update MPC HC by just running a newer installer. Your settings will carry over.
- For madVR, run the uninstall.bat, delete the old madVR folder, put the new one in its place and run the install.bat.
- For reclock and xysubfilter, run the uninstaller, and then the new installer.
Total Credits to Original Author.
If you like my post then like it and add Rep.


Torrent Invites! Buy, Trade, Sell Or Find Free Invites, For EVERY Private Tracker! HDBits.org, BTN, PTP, MTV, Empornium, Orpheus, Bibliotik, RED, IPT, TL, PHD etc!
Results 1 to 5 of 5
Thread: Advanced Video Setup for MPC-HC
Threaded View
-
09-30-2013 #1User


- Reputation Points
- 534
- Reputation Power
- 48
- Join Date
- Sep 2013
- Posts
- 59
- Time Online
- 2 d 3 h 52 m
- Avg. Time Online
- N/A
- Mentioned
- 1 Post(s)
- Quoted
- 2 Post(s)
- Liked
- 39 times
- Feedbacks
- 2 (100%)
Advanced Video Setup for MPC-HC


 Reply With Quote
LinkBacks (?)
-
Untitled document
Refback This thread02-15-2017, 08:27 PM


