
 LinkBack URL
 About LinkBacks
There are tons of anaglyph 3D videos and images available on the Internet. Sadly though, you need equipment ...
There are tons of anaglyph 3D videos and images available on the Internet. Sadly though, you need equipment to watch all of this. Fear not now, as with household equipment, ten bucks and close to ten minutes of your time (depending on your craft skills), you can create the cheapest 3D glasses for your 3D viewing pleasure. Let’s quickly get started...
Step 1: Things you need:
- Cardboard
- Chart paper
- Red Cellophane paper
- Blue Cellophane paper
- Cutter, Glue, Scissors
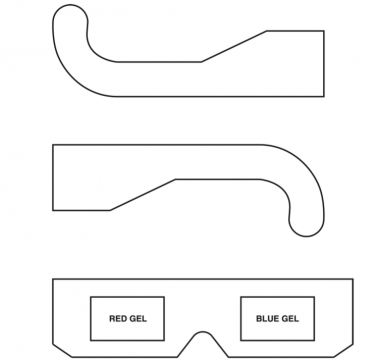
Step 2: Draw your own design that you would want to see in your 3D glasses. If you’re lazy and uninspired, cut out the sample design given in the image.
Step 3: Stick that design on to your cardboard and cut it out so that you have a sturdy frame.
Step 4: Ensure that the eyeholes and the area for the nose are properly cut. You don’t want your skin to get sore, or the cardboard to block your visibility.
Cut out the sides in a similar way.
Step 5: Cut out the red cellophane and blue cellophane paper and stick them on the front of the glasses. Be sure to remember that the red needs to go on the left and the blue needs to go on the right.
Step 6: Voila! Your 3D glasses are ready! All it took us was close to twenty minutes to get the whole experiment done.


Torrent Invites! Buy, Trade, Sell Or Find Free Invites, For EVERY Private Tracker! HDBits.org, BTN, PTP, MTV, Empornium, Orpheus, Bibliotik, RED, IPT, TL, PHD etc!
Results 1 to 1 of 1
Thread: How to make 3D glasses for $4
-
05-28-2012 #1Extreme User


- Reputation Points
- 345
- Reputation Power
- 77
- Join Date
- Jan 2011
- Posts
- 2,544
- Time Online
- 18 h 11 m
- Avg. Time Online
- N/A
- Mentioned
- 3 Post(s)
- Quoted
- 2 Post(s)
- Liked
- 73 times
- Feedbacks
- 144 (100%)
How to make 3D glasses for $4


 Reply With Quote


